We saw a surge in the popularity of video as a content marketing format. Video as a tactic was likely streamlined by your creative team as a one-to-many awareness play, with lots of focus on expensive production and little analysis to show for it. 2018 transformed video from a singular marketing tactic to an entire business strategy. What does 2020 mean for video marketing? 2020 is the year for video as a holistic business approach, meaning video content will be produced by all teams in a conversational, actionable, and measurable way.
Before you begin filming, you first need to determine the type of video(s) you want to create. Check out this list to better understand your options.
1. Demo Videos
Demo videos showcase how your product works — whether that's taking viewers on a tour of your software and how it can be used or unboxing and putting a physical product to the test.
2. Brand Videos
Brand videos are typically created as a part of a larger advertising campaign, showcasing the company's high-level vision, mission, or products and services. The goal of brand videos is to build awareness around your company and to intrigue and attract your target audience.
3. Event Videos
Is your business hosting a conference, round table discussion, fundraiser, or another type of event? Produce a highlight reel or release interesting interviews and presentations from the gathering.
4. Expert Interviews
Capturing interviews with internal experts or thought leaders in your industry is a great way to build trust and authority with your target audience. Find the influencers in your industry — whether they share your point-of-view or not — get these discussions in front of your audience.
5. Educational or How-To Videos
Instructional videos can be used to teach your audience something new or build the foundational knowledge they'll need to better understand your business and solutions. These videos can also be used by your sales and service teams as they work with customers.
6. Explainer Videos
This type of video is used to help your audience better understand why they need your product or service. Many explainer videos focus on a fictional journey of the company's core buyer persona who is struggling with a problem. This person overcomes the issue by adopting or buying the business's solution.
7. Animated Videos
Animated videos can be a great format for hard-to-grasp concepts that need strong visuals or to explain an abstract service or product. For example, we created the following video to promote a key (intangible) theme from the 2017 State of Inbound report.
8. Case Study and Customer Testimonial Videos
Your prospects want to know that your product can (and will) solve their specific problem. One of the best ways to prove this is by creating case study videos that feature your satisfied, loyal customers. These folks are your best advocates. Get them on-camera describing their challenges and how your company helped solve them.
9. Live Videos
Live video gives your viewers a special, behind-the-scenes look at your company. It also draws longer streams and higher engagement rates — viewers spend up to 8.1x longer with live video than with video-on-demand. Live-stream interviews, presentations, and events, and encourage viewers to comment with questions.
10. 360° & Virtual Reality Videos
With 360° videos, viewers “scroll” around to see content from every angle — as if they were physically standing within the content. This spherical video style allows viewers to experience a location or event, such as exploring Antarctica or meeting a hammerhead shark. Virtual reality (VR) allows viewers to navigate and control their experience. These videos are usually viewed through devices such as Oculus Rift or Google Cardboard.
11. Augmented Reality (AR) Videos
In this style video, a digital layer is added to what you are currently viewing in the world. For example, you can point your phone's camera at your living room and AR would allow you to see how a couch would look in the space. The IKEA Place app is a great example of this.
12. Personalized Messages
Video can be a creative way to continue a conversation or respond to someone via email or text. Use HubSpot Video or Loom to record yourself recapping an important meeting or giving personalized recommendations. These videos create a delightful, unique moment for your prospects and can drive them further down the purchase journey.
How to Make a Video for Your Business
- Planning your video
- Scripting your video
- Understanding and using your cameras
- Setting up your studio
- Preparing your talent
- Shooting for the edit
- Organizing your footage
- Editing your video
- Choosing your music
- Recording your voiceover
There's a lot that goes into making a video. This section will walk you through the detailed process of creating and publishing a video for your business. Grab your camera and follow along.
1. Planning Your Video
Before you set up, record, or edit anything, start with a conversation about the purpose of your video. Why? Every decision made during the video creation process will point back to your video's purpose and what action you'd like your audience to complete after watching it.
And, of course, without a clear purpose agreed upon by your team, you'll find yourself in a whirlwind of re-shooting, re-framing, editing … and wasting a lot of precious time.
There are typically a lot of players when making a video. How can you ensure they're all aligned?
Create a questionnaire using Google Forms or SurveyMonkey and pass it along to the stakeholders of the project. This way, you can ask the same questions of everyone and aggregate your answers in one place.
- Who's your target audience? What buyer persona are you targeting? This may be a segment of your company's typical buyer persona.
- What's the goal? Is it to increase brand awareness? Sell more event tickets? Launch a new product? Ultimately, what do you want your audience to do after watching the video?
- Where's the video going to live? On Facebook? Behind a landing page form? You should begin with one target location — where you know your audience will discover the video — before repurposing it for other channels.
- When's it due? Always start with a timeline. A video on which you have a few months to work will have very a different budget and creative scope than a video needed in a few days.
- What's the budget? Video can be expensive, but it doesn't have to be … if you set a budget. Do your research and set realistic parameters, especially before you answer the next question.
- What are the creative requirements? With your budget, skills, and resources in mind, think about the creative roadblocks that might arise. Do you need a designer to create lower third graphics? Are you going to create an animated video or a live-action video?
- What will constitute success for the video? Choose several key performance indicators that correspond with your video goals — or hop down to the chapter in this guide on measuring and analyzing video.
2. Scripting Your Video
There's a time and place for videos to be off-the-cuff and completely unscripted. You have tear-jerking documentaries, vlogging rants, and, of course, the holy grail: cat videos.
That being said, most business videos need a script.
If you skip this step, you'll find yourself editing more than you need to, releasing a video longer than it should be, and probably losing your audience along the way.
Start writing your script the way you would begin a blog post — with an outline. List out your key points and order them logically.
Do all of your drafting in Google Docs to promote collaboration and real-time commenting. Use the “Insert > Table” function to adopt one of television's traditional script-writing practices: the two-column script. Write your audio (script) in the left column and insert matching visual ideas in the right column.
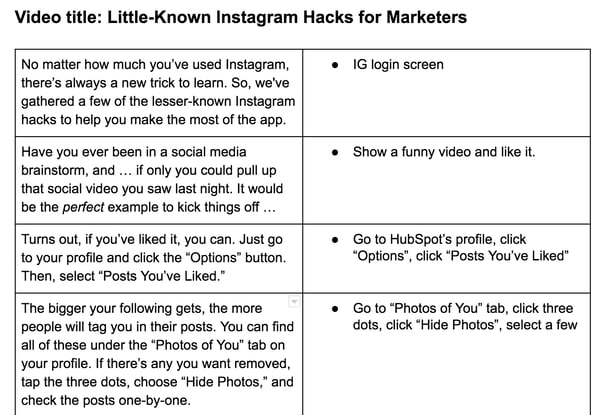
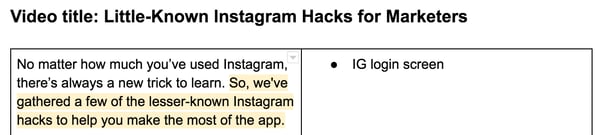
Don't make the viewer wait until the final seconds to understand the purpose of your video … we promise they won't stick around. Similar to a piece of journalistic writing, include a hook near the beginning that states the purpose of the video, especially for educational and explainer videos.
Notice, in our example below, that we don't let the audience get past the second sentence without understanding what the video will be about.
As you begin creating videos, you'll notice a key difference between video scripts and your typical business blog post — the language. Video language should be relaxed, clear, and conversational. Avoid using complex sentence structures and eloquent clauses. Instead, connect with your audience by writing in first person and using visual language. Keep the language concise, but avoid jargon and buzzwords.
Following the “Little-Known Instagram Hacks” example, note how a section from the original blog post could be transformed for video by using fewer words and relying on visuals.
- Blog Post Version: “When someone tags you in a photo or video on Instagram, it's automatically added to your profile under "Photos of You," unless you opt to add tagged photos manually (see the next tip). To see the posts you've been tagged in, go to your own profile and click the person icon below your bio.”
- Video Script: “The bigger your following gets, the more people will tag you in their posts. You can find all of these under the “Photos of You” tab on your profile.”
Most video scripts are short … probably shorter than you think. Keep a script timer handy to check your script length as you write and edit. For example, a 350-word script equates to a video that is nearly 2 minutes long.
Words on paper sound a lot different than they do when read out loud. That's why we encourage organizing a table read of your script before you start filming. The point of a table read is to smooth out the kinks of the script and nail down inflection points.
Have a few people (writer and talent included) gather around a table with their laptops and read the script multiple times through. If you accidentally say a line different than what the script prescribes, think about why and consider changing the language to make it sound more natural.
3. Understanding Your Camera(s)
Too often the fear and uncertainty of equipment keep businesses from trying out video marketing. But learning to shoot video doesn't have to be overwhelming. It's likely you have a great, easy-to-use camera right in your pocket: your iPhone.
Shooting with Your iPhone
Before filming with your iPhone, ensure your device has enough storage. Also, don't forget to enable your iPhone's Do Not Disturb feature to avoid distracting notifications while filming.
Once you open the iPhone's camera, flip your phone horizontally to create the best possible viewing experience. Then, move close enough to your subject so you don't have to use the zoom feature — it often makes the final video look pixelated and blurry.
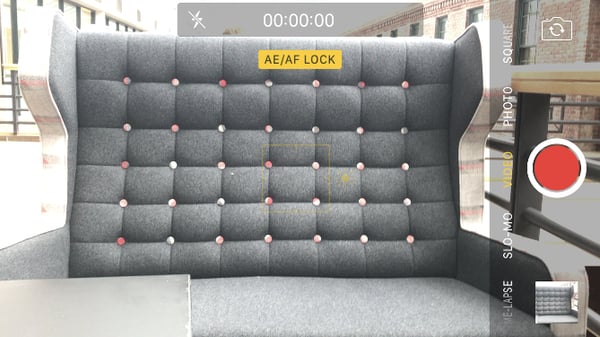
Your iPhone might do a great job of focusing on the subject when you take photos, but when it comes to video the camera will continue adjusting and re-adjusting as you move around the scene. To solve this problem, lock the exposure before you press record. Hold your finger down on the subject of the video until a yellow box appears with the words “AE/AF Lock”.
Shooting with Prosumer and Professional Cameras
While iPhones are great for filming on the fly or becoming acclimated with video, at some point you may feel ready to graduate up to the next model. With all the digital cameras on the market, there are a ton of choices to pick from. Below we've identified a few options to simplify your search.
The first choice you make will be between purchasing a “prosumer” camera and a professional camera.
Prosumer cameras are considered the bridge between basic compact cameras and more advanced cameras. They're perfect for someone interested in creating more video but want the option to just press record. Most have a fixed lens to keep things simple.
Professional cameras, like DSLRs, give you fine control over the manual settings of shooting video and allow you to achieve the shallow depth of field (background out of focus) that people rave about. While they're primarily used for photography, DSLRs are incredibly small, work great in low light situations, and pair with a wide range of lenses — making them perfect for video. However, DSLRs do require some training (and additional purchases) of lenses.
If you're interested in going the prosumer route, take a look at the Canon PowerShot ELPH 340. The GoPro HERO5 is another fun option for adventurous shoots with lots of movement.
Considering the expense of a DSLR camera, research your options and read plenty of reviews. Top of the line options (from most expensive to least) include the Sony Alpha a7SII, Nikon D810, and Canon EOS 5D Mark III. For a more cost-effective option, check out the Canon EOS 7D Mark II, Canon 80D, Nikon d3300, or Canon EOS Rebel T6.
Understanding Your Camera's Manual Settings
If you choose a DSLR, there are a few settings you need to understand before your first shoot: frame rate, shutter speed, ISO, aperture, and color balance. Definitely keep your camera nearby as you read — manual settings can seem quite abstract without testing them for yourself.
But before we dive in, we want to stress that this is a high-level overview of each setting. If you find yourself wanting more, dive in and do some of your own research. There's plenty to learn about how to manipulate these settings and use them together to create different looks.
Lastly, there will be a different method for adjusting these settings based on your specific camera. Always refer to your camera's instruction manual.
Frame Rate
As with video concepts, there are tons of customization options. The most basic customization option when it comes to frame rate is shooting your video at 24 frames per second (fps) or 30fps.
Video experts often credit 24fps with a more “cinematic” look, while 30fps is more common, especially for videos that need to be projected or broadcasted. A good rule of thumb is to ask the end user of your video what his or her preferences are and shoot based on that. Then, be sure your resolution is at least 1920 x 1080 to maintain quality footage.
What does aperture mean for your video? When a lot of light comes into the camera (with a low f-stop number), you get a brighter image and a shallow depth of field. This is great for when you want your subject to stand out against a background. When less light comes into the camera (with a high f-stop number), you get what's called deep depth of field and are able to maintain focus across a larger portion of your frame.

Shutter Speed
To understand shutter speed, we first have to talk about photography. When taking a photo, shutter speed refers to the length of time the camera's sensor is exposed to light. Think of it as how quickly or slowly the camera blinks.
If you've seen a perfectly timed photo of a hummingbird seemingly frozen in time, you've witnessed a very fast shutter speed. Meanwhile, an image of a rushing river with the water blurring together was probably taken with slow shutter speed.
Shutter speed is measured in seconds, or in most cases, fractions of seconds. The greater the denominator of the fraction is, the faster the shutter speed. So, 1/1000 would be faster than 1/30.
But what does shutter speed mean for video? We won't go too deep into the science of shutter speed, but to pick the adequate setting, you'll have to do a little math. First, multiply your frame rate by 2. So if you're shooting in 24fps, that would be 48. This number becomes the denominator of your shutter speed fraction.
Since shutter speed is only available in a few increments, you'll need to round 1/48 up to the next closest setting: 1/50. Here are some common shutter speeds and how to calculate them:
- At 24fps, 24 x 2 = 48, equalling a shutter speed of 1/50
- At 30fps, 30 x 2 = 60, equalling a shutter speed of 1/60
- At 60fps, 60 x 2 = 120, equalling a shutter speed of 1/20
Remember, this process is just a guideline for choosing shutter speed. Traditionalists stick to these calculations, but there's always room to tweak shutter speed slightly to achieve a desired effect. In the case of video, rules can be broken — as long as you have a good enough reason.
ISO
Last in the Exposure Triangle is ISO. In digital photography and videography, ISO measures the camera sensor's sensitivity to light. On your camera, you'll see the settings referred to with numbers in the hundreds or thousands (e.g. 200, 400, 800, 1600, etc).
The higher the number, the more sensitive your camera is to light … the lower the number, the less sensitive. ISO also affects the graininess of the image. Low ISOs produce a crisp shot, while high ISOs create a more noisy, grainy shot.
When choosing an ISO, consider the lighting. If your subject is well-lit (for example, if you were outside), you can get by with a lower ISO, ideally around 100 or 200. If you're indoors in a low-light situation, you'll need to bump up the ISO — just be careful of how grainy it makes your shot.
This is where you can begin to see how the three factors of the Exposure Triangle work together. When you have a low-lit situation, for example, you may choose a lens that can shoot with a low f-stop to let more light into the camera and avoid making the shot too noisy with a high ISO.

If you're just starting out with manual video settings, don't be overwhelmed. Understanding the ins and outs of the Exposure Triangle takes time and a lot of practice. Here are two tips to beat the learning curve:
- Start with photos. By switching your camera off video mode, you'll be able to see the relationship between aperture, ISO, and shutter speed. Take a ton of photos and change each setting incrementally. Over time, the numbers will be less intimidating and switching between settings will make more sense — and become easier to apply to video.
- Form a process. Every videographer has their own method, but we suggest setting your shutter speed first according to the math described above. Then adjust aperture according to the depth of field you want to create. Then, ISO. Finally, circle back to shutter speed for any fine adjustments.
While aperture, shutter speed, and ISO may be the three main pillars of manual photography and videography, there is a fourth piece of the puzzle that's just as important: white balance.
White Balance
White balance tells your camera the color temperature of the environment you're shooting in. Different types of light have different colors. For example, incandescent bulbs (like what many people put in a lamp) have a very warm color. The fluorescent lights (if you're reading this in an office, look up) are a little bit cooler. Daylight is cooler yet. Before you begin shooting, you have to adjust your camera's white balance according to your setup.
The exact settings on your camera will depend on your model, but there's likely an auto option, a bunch of presets (daylight, cloudy, tungsten, etc.), and custom. Avoid auto white balance at all costs and opt for a preset or custom instead. If you have a top-of-the-line DSLR, there may also be an option to manually set the color temperature of the room, measured in Kelvin.
To help you understand the importance of setting your white balance, consider the difference between these two photos. The environment is lit with yellow fluorescent lights. You can see how the appropriate setting looks natural, while the daylight setting adds a blue tint to the scene.

Focus
Focus isn't one of the key settings of shooting, but it's definitely important to keep in mind. With a DSLR, you have the option to shoot with autofocus or manual focus. It depends on the camera and lens you have, but typically autofocus is not the most accurate.
Instead, flip your lens to manual focus. Use the (+) and (-) buttons to enlarge the viewfinder and move in close to your subject's face. Then, adjust the focus on the lens. For shooting a stationary setup like an interview, make sure the subject's eyelashes are in focus — that way, you can be certain your footage is clear and sharp.
4. Setting Up Your Studio
When you begin building your in-office studio, the purchases can add up quickly. Not only do you need a camera, but the more you read, the more you realize you need tripods, lights, microphones, and more.
Take a breath. With a little bit of know-how, building your studio doesn't have to be overwhelming. There are plenty of cost-effective choices and DIY hacks to make sure your videos look top-of-the-line.
Basic Equipment
Always shoot with a tripod. It should go without saying, but the handheld method you use for your Snapchat story isn't going to cut it. Tripods will ensure you maintain a steady shot and not break any expensive equipment in the process.
Tripods range tremendously in price, and the quality of your tripod should depend on the level of camera and lens you have. If you're shooting with your phone, you can get by with a table mount like the Arkon Tripod Mount or a full-size tripod like the Acuvar 50” Aluminum Tripod. For a DSLR, Manfrotto makes a variety of trustworthy tripods starting with the Manfrotto BeFree and increasing in quality and price from there.
Along with the tripod, stock up on camera batteries and SD cards. Recording video will cause you to run through both much quicker than taking photos.
Audio Equipment
If you've begun testing out your camera's video capabilities, you've probably noticed that it has an internal microphone to record audio … don't use it.
If you set up your camera at a reasonable distance from your subject, you'll quickly learn that the internal microphone isn't powerful enough to adequately record audio. Instead, you should begin investing in a few pieces of quality sound equipment.
When you're shooting with your iPhone, there are a ton of microphone options that are all easy to use and decently cheap. For example, the Movo MA200 Omni-Directional iPhone microphone will give you a plug-and-play solution for capturing audio on the fly.
Opinions vary greatly among sound engineers on the best method and equipment for recording audio with a DSLR. You've likely seen many videos that use a lavalier microphone — the small piece that clips below the collar of the talent's shirt. Lavaliers come in both wired and wireless options. However, lavaliers can be a bit obtrusive both for the talent (who has to have a wire threaded down his or her shirt) and for the viewer (who has to see a microphone for the whole video).
Instead, if you know you're recording in a controlled environment (like a conference room in your office) we suggest recording with a shotgun mic. They're reliable, remain out of the shot, and record background noise in a natural sounding way.
To create a shotgun mic setup in your office studio, you'll need a shotgun mic like the Sennheiser ME66, a shotgun clip, light stand, XLR cable, and Zoom H4N recorder. The Zoom recorder will allow you to record audio separately on an SD card and adjust the gain for the environment you're shooting in.
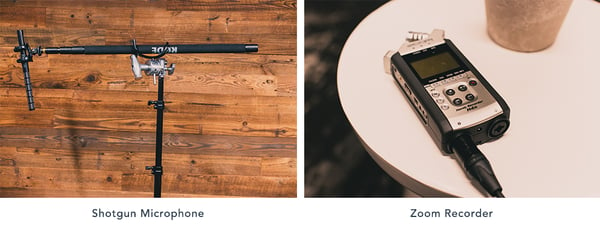
We admit these audio purchases may sound like a lot. But a shotgun mic setup is a worthy investment that will last for years. If you're looking for a more cost-effective solution, look into the Rode VideoMic that mounts on top of your DSLR and plugs right into the camera body.
Lighting Equipment
You have a camera. You have audio. Now, let's talk about lights.
To outfit your studio without breaking the bank, head over to your local home improvement store. Pick up extension cords and a few clamp lights with bulbs. You'll also need three light stands, which are available on Amazon.
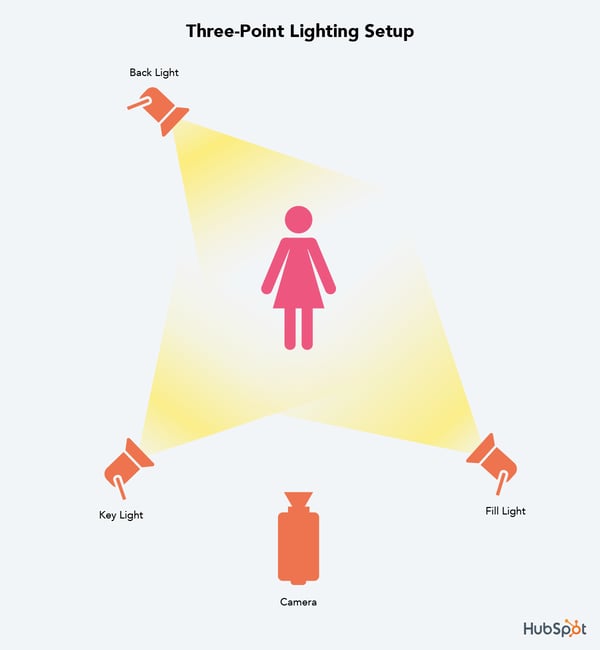
The traditional setup of video lights is known as three-point lighting. As you might guess, it involves three lights placed strategically around the subject, wrapping them in light and creating appealing shadows on their face.
First, you'll need a key light. Place this at a 45-degree angle to the left or right of the subject. Lift the light above their head and aim it downwards. As the name suggests, this is the key light and should be bright enough that it could be the only light in the scene … if it had to be.
Next, place the fill light at a 45-degree angle on the other side and lift it close to or just above eye level. The purpose of the fill is to soften the shadows created by the key, but without getting rid of them completely. Therefore, the fill should be dimmer than the key light. If you have to use the same type of light for both, scoot the fill back and diffuse it by clipping a clear shower curtain onto the clamp light with clothespins.
Finally, the backlight will add a third layer of dimension. Scoot your subject away from the background. Lift a light above the subject's head and place it behind them and off to the side so it's out of the frame. The light should be aimed at the back of their head, creating a subtle rim of light and separating them from the background.
Setting Up Your In-Office Studio
Now that you have all of your equipment, you're finally ready to build your office studio. While you could always grab a closet to store your equipment in, let's go a bit bigger and claim a conference room.
By having a designated studio, you'll save loads of prep time for each shoot. Just make sure the conference room isn't too empty. If you have to, bring in a couch, chairs, or blankets to minimize the echos in the room.
Speaking of sound, pay special attention to the hum of the air conditioning. Find a room with minimal noise or turn down the fan during recording. Consider purchasing photography paper to create a background that's a little more appealing than a white conference room wall.

When it comes time to shoot, clear out unnecessary people from the room and turn off the overhead lights. With your three-point lighting setup, there will be no need for those harsh fluorescents. When — and only when — everything is set up, call in your talent. There's nothing worse than being nervous, and then having to anxiously watch as lights are turned on and the camera is tested.
5. Preparing Your Talent
If you have experienced, confident actors in your company, you're lucky. Video talent is a rare resource. But with a little bit of coaching (and a fair share of nervous laughter), you can help your teammates thrive in front of the camera.
No matter if it's your first video or your fiftieth, remember that getting in front of the camera is scary. Schedule plenty of time and give your talent the script early — but make it clear they don't need to memorize it.
Instead, place a laptop below the eye-line of the camera. Break the script into short paragraphs and record it section by section until you capture a great take of each. If you plan in advance when the final video will show b-roll (supplementary footage or screenshots), you can have your talent read those lines directly off the laptop like a voice over.
During the shoot, your job goes beyond pressing record. First and foremost, you need to be a coach. Balance critical feedback with support and be quick to give encouragement after each take. This is why conducting a table read during the scripting process is so important: It's easier to give feedback when there's not a camera in the room. Remember, be a little silly during the shoot or your talent will be on edge and uncomfortable — and it will show in the footage.
But while you're maintaining the fun level on set, remain vigilant. It's your job to pay attention to the little things, like making sure all of the mics are on or noticing if the lighting changes. Record each section many times and have your talent play with inflections. When you think they've nailed the shot … get just one more. At this point, your talent is already on a roll, and options will help tremendously during editing.
Finally, circle back to the beginning of the script at the end of your recording. Chances are your subject got more comfortable throughout the shoot. Since the beginning is often the most crucial part of the video, record that section again when they're feeling the most confident.
Composition Basics
There are some films that are simply beautiful. It's not the story or even the picturesque setting. In fact, the scene might take place in the dingiest of sets, but somehow each shot just feels right.
That's the power of composition. When objects appear where they should in the frame, the quality of your video increases exponentially.
For video, the rules of composition are similar to what you may have learned in a photography or art class. First, consider the rule of thirds — the idea that you can create a sense of balance by imagining the canvas with two horizontal lines and two vertical lines. Key elements should occur at the intersection of these lines.

For example, if you are shooting an interview or a how-to video, the subject's eyes should align with the top horizontal line around one of the two intersections. For this “talking head” shot, you can also improve your composition by leaving enough (but not too much) headroom. This is the empty space above the person's head.
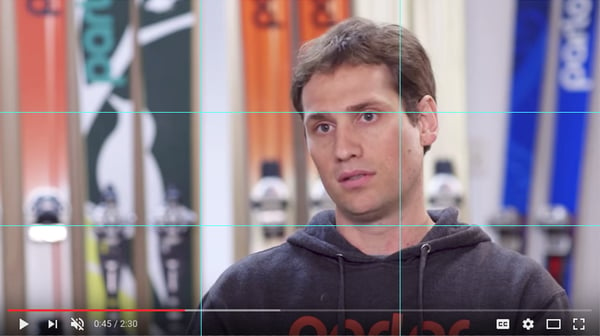
Image Credit: Hubspot Customer Success Story Featuring Parlor Skis
One of the best ways to improve the look of your video is to include b-roll. B-roll is the supplementary footage included as a cutaway. This might include shots of a customer service rep talking on a phone, a designer editing your website, visuals of your office, or even screenshots of your product. The key with b-roll is to make sure each and every piece enhances the story.
When you're collecting b-roll, include a mix of shots from varying angles and distances. In fact, film professionals use different names to describe these variations.
- Establishing Shots: Wide shots allow the viewer to see the entire scene. These are great to use when introducing the scene at the beginning of a video.
- Medium Shots: Tighter shots that focus on the subject or a portion of the scene. Your classic interview shot could be considered a medium shot.
- Close-ups: Tightly cropped shots zoomed in to show detail. These might feature someone's hands typing on a keyboard or pouring a cup of coffee.
As practice, try telling a story with your b-roll and planning out a shot sequence. For example, your subject might open a door from the hallway, walk into their office space, sit down at their desk, open their laptop, and begin typing. Seems simple, right? But a shot sequence showing this 10-second scenario might consist of six or more different b-roll clips.
Here's where the final lesson of composition comes in: continuity. Continuity is the process of combining shots into a sequence so that they appear to have happened at the same time and place. A key part of continuity is making sure any ancillary objects in the scene — for example, a cup of water on a desk — stay in the same place (and have the same amount of water) throughout all of the shots.
The other part of learning continuity is match on action. For the scene described above, you'd want to record the subject opening the door and walking in from both inside and outside the room. In post-production, you could then flip between the clips at the exact right time to make the cut seamless.
6. Shooting for the Edit
When it comes to video, some are better at shooting while others are better at editing. Whatever side you claim, you should understand the process and pain points of each.
For instance, as the person behind the camera, you may believe you collect ample footage and ask all the right interview questions. But to the editor, you may actually be shooting too much of one type of shot and missing out on some that would make their job easier.
Filmmakers teach a valuable lesson here: shoot for the edit. By remembering that the footage you record will be edited later, you can make smarter decisions and save countless hours in the editing room.
The first step in adopting a shoot-for-the-edit mindset is remembering to leave a buffer at the beginning and the end of each clip. There are called handles and can save editors from the headache of cutting too close to an important shot.
In the section on preparing talent, we discussed how to record your script in short sections. If the editor were to stitch these sections together side-by-side, the subject's face and hands might abruptly switch between clips. This is called a jump cut, and for editors, it poses an interesting challenge. Thankfully, this is where b-roll comes in handy, to mask these jump cuts.

Example of a jump cut
As a producer, your job is to capture plenty of b-roll to make sure your editor never runs out. Create a shot list of more b-roll ideas than you think you'll need and mark them off as you record them.
To mask jump cuts, you can also shoot with two cameras, especially if you're recording an interview without a script. Camera A would be the traditional, straight-on shot. Camera B should be angled 30 to 45-degrees to the side and capture a distinctly different shot. The editor could then flip between these two views to make the cut appear natural.

Example of switching between interview angles
A note about shooting with two cameras: Your editor will need to sync the footage between the different views. To help them do this, clap your hands loudly in the view of both cameras right before you ask the first interview question … yes, just like an old fashion clapboard. Modern editing software has auto-sync features, but this loud clap will help you initially line up the clips.
Finally, mark your good clips. Even if you're recording a scripted video, you might have to record each section 10 or more times. Once your subject nails the take, wave your hand in front of the lens. That way, the editor can scrub directly to this visual cue and save time on footage review.

7. Organizing Your Footage
Yes, file organization is boring. But when video editing, it just might save your project.
Capturing video will force you to take a hard look at your computer and file organization habits. If you're one of those people who work off a cluttered desktop — you know who you are — you'll find yourself in a world of hurt.
First, video format files are incredibly large, so it's very unlikely you'll want to store any of them on your internal hard drive. You'll quickly run out of storage, and your computer's processing speed will begin lagging under the weight.
Instead, invest in an external hard drive like one of the Lacie Rugged models. External hard drives come in a variety of sizes and port options (Thunderbolt, USB 3.0, etc.). Multimedia creators will use the phrase “working off of an external” to describe storing all of their project files on this hard drive. This method also makes it easier to collaborate with teammates because you can easily share the drive.
Second, video editing programs are very particular about where you keep your files. If you don't stick with the original file structure, you may find yourself buried in error messages. (We'll cover software options and best practices in the next section.)
On your external hard drive, you should create a separate top-level folder for each project. Within this folder, there should be a prescribed set of “buckets” to store your video footage, audio, design assets, and more. Create a template project folder that you can copy and paste for each project using the image below as a guide.
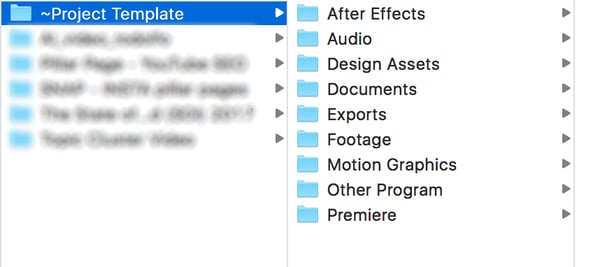
When you import your footage from your camera, place it in the “footage” folder on your hard drive.
For both the project folders and your editing files, follow a consistent naming structure. For example, you could start each name using YRMODA (year-month-date). So a video on Instagram Hacks might be named “180625_instagram_hacks” if it was started on June 25, 2018.
Even with a perfectly organized external hard drive, you're not yet out of the weeds. You need to back up your files (and maybe even back up your backup files). It's not uncommon to have an external hard drive for everyday work, another external for backups, and a third set of backups in the cloud via Dropbox or Google Drive.
8. Editing Your Video
Okay, you've filmed your video footage. Congrats — you're halfway there!
Now it's time to talk about editing. We get it, video editing can be confusing. It's easy to feel overwhelmed at first, especially when you see software price tags! Luckily, there are many options for video editing based on your skill level, operating system, and budget. There are even free programs and mobile apps! Let's go over a few options.
Intermediate: Apple iMovie
iMovie is Apple's video editing software. Compatible with Macs and other iOS devices, iMovie is simple, user-friendly, and free on all Apple products. iMovie allows you to create and edit your videos by cutting together clips, adding titles, music, sound effects, basic color correction, filters, and special effects.
The program even provides helpful templates that simplify the editing process. The platform supports high-quality clips like 4K video footage and makes it easy to share your work directly to a video hosting platform. Limited access to advanced color correction and editing features mean it isn't commonly used by professionals, but iMovie is still a great option if you're just starting out.
Advanced: Adobe Premiere Pro
Adobe Premiere Pro is a leading video editing software program used by amateurs and professionals alike. With a customizable interface and numerous advanced editing tools, the platform is often called the industry standard for video editing and has been used to edit major Hollywood movies like Gone Girl and Deadpool.
Premiere makes it easy to collaborate with other editors, organize your material, and sync with other programs in the Adobe suite like After Effects and Photoshop. The platform supports high-quality footage (4K and higher) and includes advanced, built-in color correction and grading tools that set it apart from cheaper or free options like iMovie.
The only downside to Premiere is the cost. A year-long subscription to the latest Premiere Pro CC comes in around $240. If you're new to video editing, you may want to experiment with a cheaper option like iMovie or Adobe Premiere Elements before investing in the Premiere Pro. On the fence? Check out some Adobe Premiere Pro tutorials here.
9. Choosing Your Music
What's the first thing that comes to mind when you think about video? I'm guessing the actual video footage. While it's important to concentrate on your video footage, don't forget to factor music into your overall plan and budget.
Music is a powerful tool that can alter your video's mood and tone — just watch the videos above! Choosing the right music often makes the difference between an amateur project and a professional piece of content. When used properly, it can help keep your viewer's attention, evoke emotions, and define your overall editing style.
Before you start filming, set a music budget and research your local copyright laws. Copyright law can be very difficult to decipher, especially when you're dealing with digital content. Bottom line: Most music isn't free. If you use another artist's music without permission or proper licensing, you risk video removal and legal action. In order to avoid copyright infringement, you'll need to find royalty free tunes or pay a composer to create an original score. Royalty free songs aren't free to use; they're quality songs available for a single flat fee. This means you don't have to worry about paying additional licensing fees or royalties in the future. YouTube, Pond5, and PremiumBeat are all great sites to find royalty free music.
Next, consider your audience and the overall mood for your production. Are you targeting a small audience that will appreciate the newest, underground hip-hop track, or do you need something that will appeal to many demographics? Are you creating a practical product tutorial or an upbeat event recap? Be sure to choose music that enhances the overall tone of your video.
In addition to considering your audience, be sure to contemplate the purpose of the music. Do you need background music or something with real impact? Will you be narrating or speaking in the video? If so, don't let the music get in the way of your content. Sometimes the best music is the music you don't remember at all.
After you've determined the type of music you need, it's time to start analyzing potential songs. Consider the song's pacing. Songs with a steady rhythm are easy to change to suit your video style. Hoping to include your favorite, Top 40 hit? Popular, radio songs are usually structured in 4-5 parts and can be difficult to transition. Try to choose simple songs that are easy to loop. If you're looking for an instrumental song, be sure to find something that was recorded with real instruments. Songs made with digital samples can make your video feel unprofessional and out of date.
Finally, consider adding intro and outro music. Intro and outro music, or bookends, can serve as a theme for your content. These are a great choice if you don't need music throughout your entire video. Bookend music can help set the tone for your video, naturally split your content into chapters, and leave your viewers feeling they had a complete experience.
While some videos feel unfinished without background music, others just need a few tunes to tie the project together. Pay attention to videos that have a similar style to see how others utilize music.
10. Recording Your Voice Over
You have your video footage and music — now it's time to chat about voice overs. A voice over is the separate video narration that's not spoken by the speaker on-camera. Voice overs are an effective tool that can help make your content more relatable, emotional, and fluid.
It's important to remember that video audio is just as important as video visuals. The good news is that you don't have to be the next Don LaFontaine or hire a professional to record a great voice over. Below are a few tips to capture audio on a budget.
- Find a location. Decide on a spot to record. If you can't go to a professional studio, try to pick a quiet room away from distracting external sounds like sirens, opening and closing doors, and people talking on the phone. Read your script aloud, and pay attention to the room's acoustics. Does your voice echo or sound muffled? If so, consider recording in a different space or adding furniture to fill in the room.
- Prepare. Practice makes perfect! Before you record, read through your script a few times and take note of any difficult pauses, transitions, and words. On the big day, be sure to stay hydrated and avoid wearing noisy clothing or jewelry. Also, use a stand, laptop, or teleprompter while recording so you aren't rustling through a printed script.
- Test and listen. Think you can record the perfect voice over in just one take? Think again! Invest in a good pair of headphones and keep an eye on your audio quality throughout the recording process. It's easier to get a new take of audio than trying to fix it during the editing process. We recommend running through your script a few times, especially the first few paragraphs, to ensure that your voice is fully warmed up. If you hear popping or hissing sounds, try standing further away from the mic or invest in a pop filter.
- Relax! Be sure to read slowly, pause, and take breaks while recording your voice over. Sometimes all you need is a sip of water to get back on track.
Video Hosting Platforms
You're ready to publish your video. You shot the footage, edited it together, added music and a voice over, and exported it for the web. Now it's time to get your video online so your audience can start viewing, sharing, and engaging with it.
You have several options for hosting videos online, and in this section, we'll talk about some of the best ones.
YouTube
When you ask your friends which online video platform they use, the answer you probably hear the most is YouTube. YouTube is the largest video hosting platform, the second largest search platform after Google, and the third most visited website in the world. Every single day, people watch over five billion videos on YouTube. It's also free to upload your videos to YouTube and optimize them for search.
In addition to its massive audience, YouTube offers several other features that make the platform a good option for hosting your video. Because YouTube videos are hosted on individual channels, the platform allows you to build a dedicated audience of subscribers. Users who follow your channel are more likely to see additional videos you upload.
Within your channel itself, you can also organize videos into playlists, making it easy for your audience to search within your content. As a social platform, viewers can engage with your videos by liking and commenting on them, providing you another chance to interact with your audience. YouTube also offers a variety of advertising options for more sophisticated targeting.
Although YouTube offers the benefit of reaching a large audience with no cost to upload and host videos, there are several downsides to the platform. While video ads can be a great tool for promoting your own content, the number of ads on the platform from other advertisers can detract from your viewer's experience.
YouTube is also (surprise, surprise!) highly addicting. 83% of viewers prefer YouTube over any other video platform. Once viewers are on the platform, they usually stick around to watch another video … or 20. This can make it difficult to drive traffic back to your site from the platform. Despite these barriers, YouTube is a great platform for hosting videos and growing your audience.
Vimeo
If your friends didn't answer your earlier question with “YouTube” then they most likely responded with Vimeo, the second largest video hosting platform. Vimeo's audience is significantly smaller (715 million monthly views) than YouTube's, but there are still many benefits that make it a favorite for content creators and viewers alike.
Among these is a simpler, cleaner, user interface that makes it easier to navigate the platform. Unlike YouTube, Vimeo has very limited ads and commercials that would otherwise detract from your viewers' experience. Videos on Vimeo also tend to be higher quality than on YouTube, and the audience on the platform is likely to be more professional.
Vimeo offers several different premium account options to better suit businesses. The premium accounts provide additional storage, advanced analytics, customer support, player customization, access to lead generation tools, and much more. In additional to premium accounts, Vimeo also partners with businesses to produce quality marketing content.
If you're looking to showcase high quality, artistic content, Vimeo might be the platform for you. Its engaged audience and beautiful aesthetic make it a great place to host creative videos. However, if you're focused on quantity over quality and increasing your reach, you may want to explore other platform options.
Vidyard
Vidyard is a video hosting platform built specifically for businesses. It's not just another option to store and manage your videos; instead, it allows you to become a fully video-enabled business. Here's what we mean.
These days, we know posting your video to YouTube isn't enough. You need channel-specific video content for Facebook and Instagram, not to mention for your website. Enter: Vidyard. The platform allows you to publish and update to all of these places from a central location.
From this portal, you'll find all sorts of viewer insights. Discover what types of video content your audience likes and how they watch their videos. Then, channel those insights directly into your marketing automation software or CRM. For example, if that prospect you've been monitoring views your latest case study video, you'll be notified straight away.
One of the coolest features of Vidyard is the ability to personalize videos with the viewer's name or company directly in the video design. This is a creative addition as you begin working video into your marketing and sales strategies.
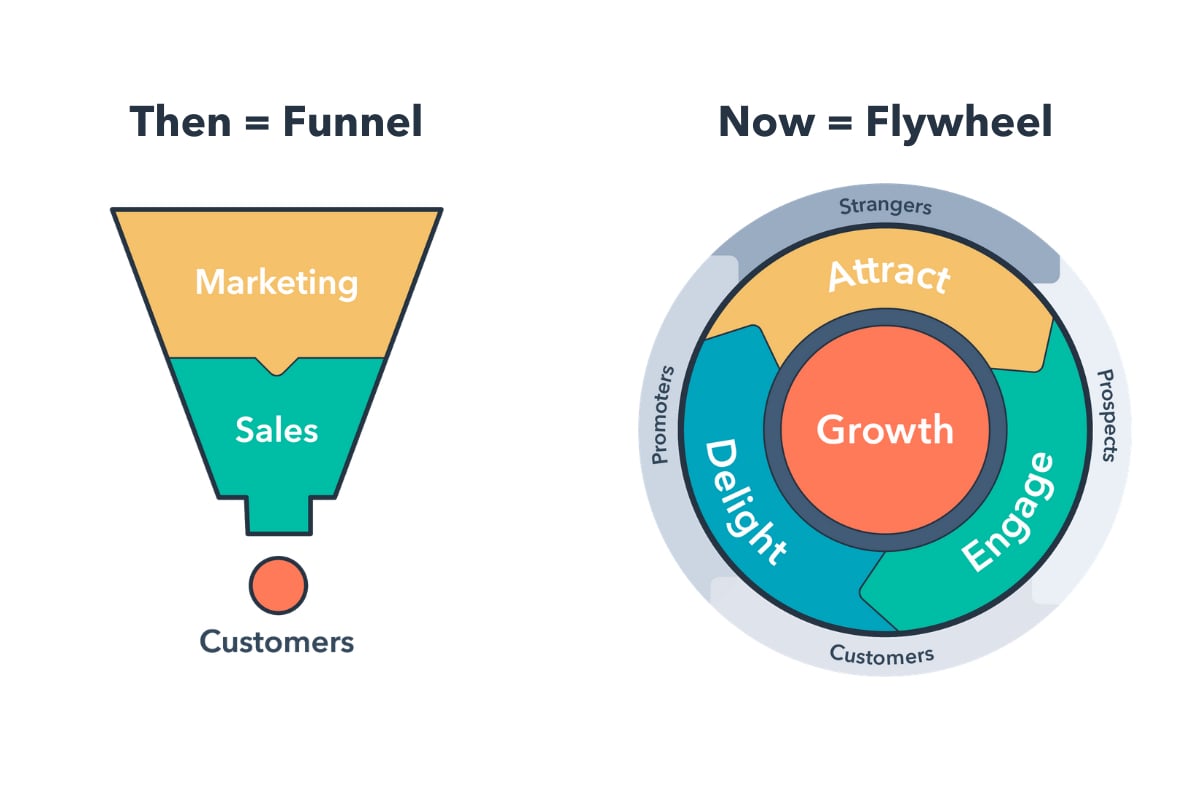
How to Use Video Throughout the Flywheel
Too often, companies jump at the opportunity to create their first video. They spend tons of money on an explainer video for their homepage, but as soon as the project is complete, all future video ambitions screech to a halt.
On the other hand, plenty of businesses churn out a slew of social videos. But since they've simply replicated fads they've seen, their videos hardly consider their audience's challenges or habits.
Considering the time, money, and resources involved, video marketing can't be an impulsive guessing game. Instead, you need to create a comprehensive video marketing strategy that applies to every facet of your flywheel. This means thinking in the context of the inbound methodology.
The inbound methodology is the marketing and sales approach focused on attracting customers through content and interactions that are relevant and helpful. Each video you create should acknowledge your audience's challenges and provide a solution. Looking at the big picture, this content guides consumers through the journey of becoming aware of, evaluating, and purchasing your product or service.

In the following sections, we'll cover the types of videos you should create for each stage in the image above. To start, plan to create at least two videos for each. Don't forget to include call-to-actions to help lead your audience through their purchase journey and into the role of "promoter." Over time, you can improve based on conversion rates and the content gaps you discover.
Attract (Marketing)
The first step of the inbound methodology is to attract — or turn strangers into visitors. Consumers at this stage are identifying their challenges and deciding whether or not they should seek out a solution. Therefore, the videos you create should empathize with their problems and introduce a possible solution in your product or service.
Ultimately, the goal of this kind of video is to expand reach and build trust. Because you are looking to garner shares for your video, it'll likely be more entertaining and emotion-evoking than educational. But, you should still provide enough information to associate yourself as an authority on the topic.
Examples of videos in the “attract” stage include snackable social videos that show off your brand's personality, thought leadership videos that establish you as a source of industry news and insight, brand films the share your values and mission, or explainers and how-to videos that provide relevant tips for solving your audience's pain point.
Discover 75 tips for creating, sharing, and optimizing video for Facebook and Instagram.
For any "attract" video, avoid speaking too much about your product. Instead, let your brand values and personality be your north star(s). Finally, because these videos can live on a variety of channels, keep in mind the strategies of each platform. For example, a Facebook video might have a square aspect ratio and text animations for soundless viewers.
Convert (Marketing + Sales)
Now that you've attracted video viewers and website visitors, the next step is to convert these visitors into leads. With most inbound marketing content, this means collecting some sort of contact information via a form. Video can aid this process by visualizing a solution to the buyer's problem, whether that's before the form on a landing page or as the offer itself. Overall, the goal of this kind of video is to educate and excite.
"Convert" videos may include a webinar filled with tactical advice, product demos sent via email, landing page promotional videos, case studies, or more in-depth explainer and how-to videos. For example, while an "attract" video might provide a quick tip for nailing a sales pitch, a "convert" video could be an animated explainer video that breaks down the inbound sales methodology.
Close (Sales)
You've attracted a new audience with your videos and converted the right visitors into leads. Now's the time to close these leads into customers. Yet, as important as this stage is, "close" videos are often the most overlooked by marketers and salespeople.
At this point, the consumer is weighing their options and deciding on the purchase. Therefore, the goal of this kind of video is to make your audience visualize themselves using your product or service — and thriving. There's a reason 4X as many customers would rather watch a video about a product than read about it. Videos are able to display functionality and leverage emotions in ways a product description never could.
Great "close" videos include testimonials of customers with relatable stories, in-depth product demos, culture videos that sell viewers on your quality of service, or even personalized videos that explain exactly how your product could help their business
Delight (Service)
A purchase may have been made, but there's still a lot of video can do to leverage the post-conversion stage of your flywheel. During the "delight stage" of the inbound methodology, your goal is to continue providing remarkable content to users that makes their interaction with your product or service as incredible as possible. It's also in hopes that they'll tell their connections about their experience or up-sell themselves. Therefore, the goal of this type of video is to encourage your customers to embrace your brand and become brand evangelists.
Your first opportunity to delight comes directly after the purchase. Consider sending a thank you video to welcome them into the community or an on-boarding video to get them rolling with their new purchase. Then, build out a library of educational courses or product training videos to cater to consumers who prefer self-service or simply want to expand their expertise.
Defining Your Goals and Analyzing Results
At this point, you know how to create a video and where to host it. You're ready to get started, right? Not quite. Before you dive in, you need to define your video goals and identify the best metrics for determining whether you've accomplished those goals.
Before launching any marketing campaign, it's important to determine your primary video goal. This could be to increase brand awareness, engagement, or even conversions for a free trial. It's crucial to pick out just one or two goals for each video. When you define more than that, your video will seem unfocused, making it difficult for viewers to determine what they should do next.
When thinking of your goals, be sure to keep your buyer persona and target audience in mind. How old are they? Where do they live? What are their interests? How do they typically consume media? What stage of the buyer's journey are they in?
All of these questions can help determine what type of video you should make and where you should post it. For example, if your target audience is not familiar with your company, you probably want to make a video that focuses on brand awareness before producing an in-depth, product video. You'll also want to host your video on a site that already has a large reach, like YouTube.
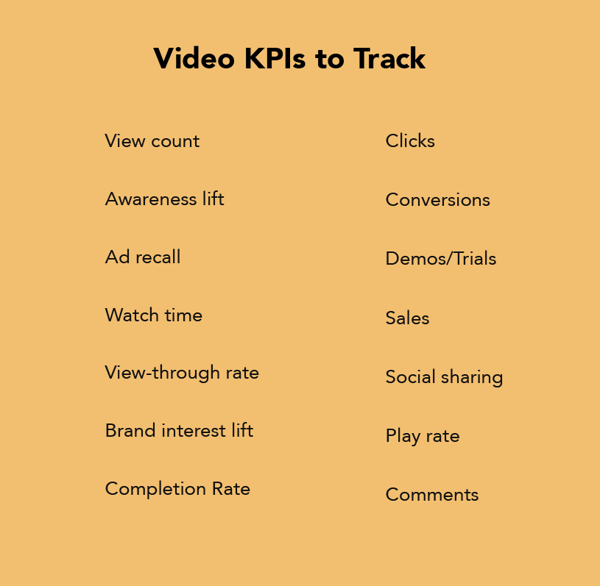
Next, let's talk about metrics. Understanding these will equip you to define and measure your success and set your goals. When you post a video, it's easy to get obsessed with one metric — view count. While view count can be an important metric, there are many others that may be more relevant to your campaign.
Below are some popular metrics you'll see when you publish and track video.
- View Count: View count is the number of times your video has been viewed — also referred to as reach. This metric is great to track if your goal is to increase brand awareness and have your content seen by as many people as possible. However, it's important to remember that every video hosting platform measures a view differently. For example, a view on YouTube is 30 seconds while a view on Facebook is only 3 seconds. Be sure to read the fine print before reporting on your video view count.
- Play Rate: Play rate is the percentage of people who played your video divided by the number of impressions it received. This metric helps determine how relevant or appealing your video is to your audience. If thousands of people see your video, but only a handful of people play it, it's probably time to optimize your content.
- Social Sharing and Comments: If you're on social media, you're probably familiar with sharing and commenting. Social shares and comments are good indicators of how relevant your content is with your target audience. If a viewer watches your video and takes the time to share it with their network, you probably created a great piece of content. Social shares are also important because the more times your video is shared, the more it'll be viewed. If your goal is to reach a lot of people, social shares is a good metric to track.
- Video Completions: If you took the time to make a video … you probably want people to watch the whole thing, right? A video completion is the number of times a video is played in its entirety. This metric can be more reliable than view count when trying to determine your video's success.
- Completion Rate: Completion rate is the number of people who completed your video divided by the number of people who played it. Completion rate and other engagement metrics are a great way to gauge a viewer's reaction to your video. Do you have a low completion rate? Are people all dropping off at a certain point? This might be a sign that your video content is not resonating with your target audience.
- Click-Through Rate: Click-through rate (CTR) is the number of times your call-to-action (CTA) is clicked divided by the number of times it's viewed. CTR is a great indicator of how effective your video is at encouraging people to take your desired action. If your CTR is low, consider revising the design or copy of your CTA.
- Conversion Rate: Conversion rate is the number of times visitors completed your desired action divided by the number of clicks on your CTA. If your goal is to have your viewers complete an action like signing up for a free trial, try adding a video to your landing page to see if your conversion rate increases.
- Bounce Rate and Time-On-Page: Are you thinking about adding a video to a web page? Take note of the page bounce rate and the amount of time people spent on the page before you add the video. Be sure to check the metrics after you place the video to see if changes the way people interact with your other content.
Ready, Set, Action!
I'm guessing you're feeling a little overwhelmed right now. Don't worry, you're not alone. Video editing and marketing can seem daunting at first, but with a little practice and patience, you can easily produce high-quality content that is unique to your brand.
With 71% of consumers watching more video online than they were a year ago, brands can no longer ignore their growing popularity. Thankfully, creating great content has never been easier!
Try turning a written blog into a video or create a product tutorial. Using video to showcase information in a new, interesting way is sure to interest and delight your audience. Pick up a camera, start filming, and watch your engagement levels increase. It's time to make video a key part of your marketing strategy!


.jpg?width=50&height=50&name=20x50docpanel%20(2).jpg)

